Playing the Scales on the Keyboard
 Knowing the scales, playing them with correct scale fingering and practicing go hand in hand.
Learning the math and the theory is a straight forward process taking some time to work, but actually playing the scales that’s another effort.
Starting out playing the scales on an instrument is not always as clear as it would seem.
This is especially true of working with the keyboard. In practicing one hand the sequence of fingers is nearly the same for most major scales.
Using two hands the fingerings are different because the fingers which are used alternate and cross over/under at different times.
It takes some practice to get the two hands to work together.
This section deals with scale practice using a keyboard or piano.
Learning Fingering For Scales
The fingerings on a keyboard can be taught with right hand (RH) then left hand (LH) and then very slow with both hands (BH).
By beginning with one scale and learning the fingerings first through all three of the hand sequences the same process can be applied to new scales.
Starting easy with the C scale or even the B scale (because of the thumb being the only one on white keys) will easily let you learn to finger other scales and quickly learn them and get both hands working together.
Finger Numbers
First let’s take a look at the fingers of your left and right hands.
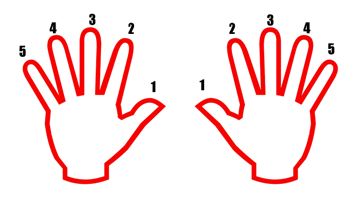
Look down at your hands as shown below the numbering starts with the thumb as 1 working to the outside with your little finger as 5.
Your Finger Numbers

Looking Down at Your Hands
Keyboard Fingering for the Major Scales
For your right hand the typical finger pattern for the major scales that start on white keys is:
RH: [ 1 - 2 - 3 ] - [ 1 - 2 - 3 - 4 ] - 5
LH: 5- [ 4 - 3 - 2 - 1 ] - [ 3 - 2 - 1]
There are two exceptions, one for each hand. These are discussed below. Also starting on a flat or sharp key signature major scale has a different starting pattern, but the fingering locations on the black keys stay the same.
See below.
Here is the C scale
 C Major Scale
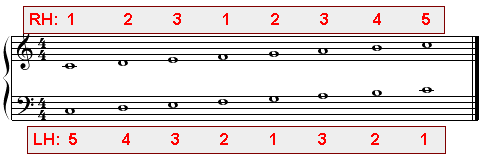
The RH scale fingering for the C scale is
Fingers: 1 - 2 - 3 - 1 - 2 - 3 - 4 - 5
Notes: C - D - E - F - G - A - B - C
And on the key board

C Major Scale RH Fingering
Note If you are continuing on to a another octave the 5 becomes 1.
You repeat the pattern of 1 – 2 – 3 – 1 – 2 – 3 – 4 without the 5 finger until you end the scale at the top end to finish.

C Major Scale RH Fingering 2 Octaves
The Left Hand scale fingering for the C scale is
Fingers: 5 - 4 - 3 - 2 - 1 - 3 - 2 - 1
Notes: C - D - E - F - G - A - B - C
And on the key board

C Major Scale LH Fingering
Note If you are continuing on to a another octave the 5 becomes 1 when going down.
You repeat the pattern of 4 – 3 – 2 – 1 – 3 – 2 – 1 without the 5 finger until you end the scale at the left end to finish.

C Major Scale LH fingering 2 Octaves
Crossing the Thumb (number 1)
One simple rule to follow with moving the thumb or fingers to get to the following sequence of notes.
1. Any time you move the thumb to press a new key you move it UNDER your other fingers.
2. Any time you move finger to the other side of the thumb you move them OVER the thumb.
Practice moving the Thumb.
The Exceptions
Right Hand
The exception for Right Hand fingering pattern for major scalesstarting on the white keys is the key of F, it uses this Pattern:
Fingers: 1 - 2 - 3 - 4 - 1 - 2 - 3 - 1(4 to end)
Notes: F - G - A - B - C - D - E - F
So you change the pattern to use 4 fingers first. Instead of 1 – 2 – 3 you end up going 1 – 2 – 3 – 4 and 1 – 2 – 3.
Look at the octave for The F scale fingering on the keyboard.

F Major Scale RH Fingering
See the 4 finger plays the Bb in the F scale. Try it out work it slowly to see how this pattern is applied. It this case you would also end on the 4 finger at ‘F’ if it is the end of the scale you were playing.
Left Hand
The exception for Left Hand fingering pattern for major scales starting on the white keys is the key of B, it uses this Pattern
Fingers: 4 - 3 - 2 - 1 - 4 - 3 - 2 - 1
Notes: B - C# - D# - E - F# - G# - A# - B
So you change the pattern to use 4 fingers first. Instead of 5 – 4 – 3 – 2 – 1 you end up going 4 – 3 – 2 – 1 with 4- 3 – 2 – 1.
Look at the octave for The B scale fingering on the keyboard.

B Major Scale LH Fingering
The 4 finger starts plays the B to start. Then the pattern swaps into a
3 – 2 – 1 then 4 – 3 – 2 – 1
Try it out work it slowly to see how this pattern is applied.
Summary
This is the nuts and bolts of scale fingering for major scales. As presented it seems simple, but overwhelming, work slowly through each case and you will be surprised at the knowledge you will gain.
You can learn all the piano scale fingerings with our downloadable PDF ebook, Print a page or use on your tablet.
Learning Resource
Scales Keyboard Fingering Workbook
Learn the scales. Each scale shows the keyboard fingering for left and right hands. You will learn that these are basic easy patterns and can be mastered with a little patience and practice.
Learn more about the Workbook here:

